
Data augmentation is the trick that lets a computer vision model trained on 1,000 images perform like one trained on 10,000. You don't need new photos; you take the ones you have and apply transformations (flips, rotations, brightness changes, crops, noise) that give the model effectively more examples to learn from. The model ends up more robust because it has seen the same content under more variations.
This piece walks through the augmentations that actually matter, when to use each, and the bounding-box-aware variants you need for object detection. The selection here covers most of what you'll reach for in a real project; the exotic stuff is interesting but rarely necessary.
Augmentation is one answer to a bigger question, which is why a model that scored well in training disappoints in production. We take that question on directly in computer vision accuracy: fix the data before the model, and the metrics you should be watching while you tune are in our object detection metrics guide.
The augmentations worth knowing
Start simple. The basic image-level augmentations get you most of the value with very little code or risk. Add complexity only when the simple ones stop helping.
Horizontal and vertical flip
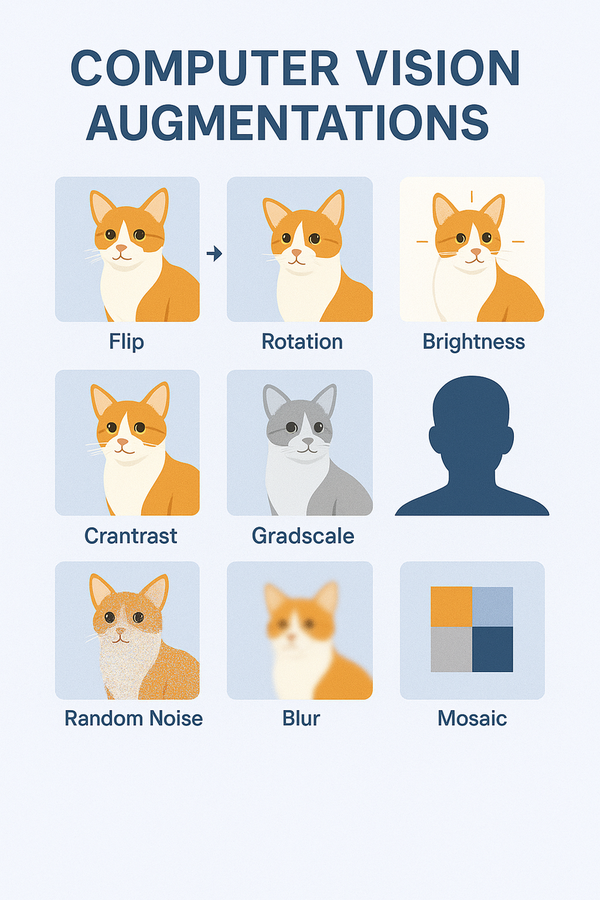
Mirror the image along an axis. Cheap, effective for tasks where left-right orientation doesn't matter. A cat is still a cat whether it faces left or right; the model shouldn't be relying on orientation to make the call.
Be careful with text and signage. Flipping "STOP" backwards isn't a useful augmentation because the model needs to recognise actual stop signs in production, not their mirror images.
Rotation
Spin the image by some angle. 90/180/270 for tasks where orientation can change drastically (overhead shots, document scans). Small angles (5-15 degrees) for tasks where slight tilt is realistic.
Same caveat as flipping: think about whether your model will encounter the augmented orientation in production. Rotating cars upside down doesn't help because nobody ships a deployed model footage of upside-down cars.
Brightness
Random brightness shifts during training make the model robust to lighting differences in production. Useful everywhere; almost no downside if the range is reasonable. Pair it with contrast for richer coverage of the lighting space.
Contrast
Adjust how much the dark and bright parts of the image differ. Higher contrast looks sharper, lower contrast looks flatter. Random small adjustments during training help the model tolerate the variable image quality you actually get from cheap cameras or compressed feeds.

Grayscale
Strip the colour. Useful only when colour isn't load-bearing for the task. For face detection: fine. For traffic sign classification: probably not, since colour is part of the signal. Use selectively.
Random crop
Take a random portion of the image. Forces the model to focus on different parts of the scene, helps with scale and position invariance. Make sure the crop still contains the thing you want the model to learn about; otherwise you're training on irrelevant patches.
Random noise
Add Gaussian or similar noise to pixel values. Mimics sensor noise, compression artefacts, transmission glitches. Makes the model less dependent on perfect input quality, which matters when production cameras aren't lab-grade.
Blur
Reduce sharpness. Helps the model handle out-of-focus or low-resolution input. Useful for video where focus drifts, or surveillance feeds that aren't 4K. Don't overdo it; if every training image is blurry, the model won't perform well on sharp ones.

Bounding-box-aware augmentations
Everything above works on the whole image. For object detection, you have labelled boxes around the things you want to find, and those boxes need to stay accurate after the augmentation. Most of the augmentation libraries handle this for you, but it's worth knowing what's happening under the hood.
When you flip an image with bounding boxes, the boxes get flipped too. When you crop, the boxes get clipped to the crop region. When you rotate, the boxes get rotated and the new bounding rectangle gets computed. If your tooling doesn't do this correctly, you'll silently corrupt your labels and your model will get confused.
Mosaic
A more advanced augmentation popularised by YOLOv4: take four training images, stitch them into a single 2x2 grid, and update all the bounding boxes to match. The model sees more objects per training image, more context variety, and more occlusion patterns. Particularly useful for detection in cluttered scenes.
There are similar techniques (CutMix, MixUp) that combine images in different ways. Worth experimenting with once your basic augmentation pipeline is in place.
How to actually use this in your pipeline
A few libraries cover most of what you'll need:
- Albumentations: fast, well-maintained, broad coverage. Default choice for most projects.
- Imgaug: older, still useful, easier API in some cases.
- TF and Keras built-ins: if you're already deep in TensorFlow, no need to add another dependency.
Start with a small augmentation pipeline (flip, brightness, slight rotation) and measure the lift on a validation set. Add more augmentations one at a time and keep what helps. Watch out for over-augmenting: if you augment so heavily that the training images barely look like real input data, the model will struggle.
Data augmentation isn't a magic bullet, but it's one of the cheapest ways to improve model performance. A solid augmentation pipeline can match the impact of doubling your dataset size, for a fraction of the cost. Pick the augmentations that match your real-world conditions, validate the lift, iterate.
Augmentation is one of those areas where 80% of the value comes from a handful of techniques used consistently. Get the basics right (sensible flips, brightness/contrast, modest rotations) before you reach for the exotic stuff. Match the augmentations to what your model will actually see in production. Measure honestly; keep what helps; drop what doesn't.
Ready to take your computer vision projects to the next level? Star our open source project HUB on GitHub! It's a powerful tool that can serve as a solid foundation for building and experimenting with computer vision applications. We welcome contributions and feedback from the community. Let's build the future of computer vision together!